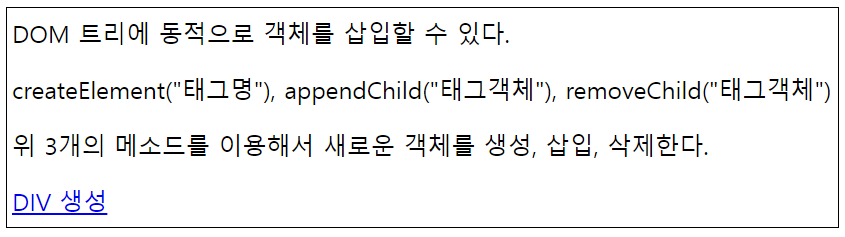
● 객체를 동적으로 생성, 삽입, 삭제
- DOM 트리에 동적으로 객체를 삽입할 수 있다.
1. createElement("태그명") : 생성
2. appendChild("태그객체") : 삽입
3. removeChild("태그객체") : 삭제
실습(DOM)
1. 객체의 동적 생성, 삽입, 삭제
<!DOCTYPE html>
<html lang="en">
<head>
<meta charset="UTF-8">
<meta http-equiv="X-UA-Compatible" content="IE=edge">
<meta name="viewport" content="width=device-width, initial-scale=1.0">
<title>객체를 동적으로 생성, 삽입, 삭제</title>
</head>
<body>
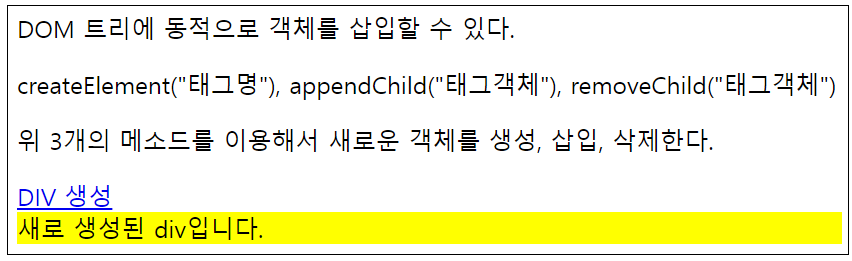
<p>DOM 트리에 동적으로 객체를 삽입할 수 있다.</p>
<p>createElement("태그명"), appendChild("태그객체"), removeChild("태그객체")</p>
<p>위 3개의 메소드를 이용해서 새로운 객체를 생성, 삽입, 삭제한다.</p>
<a href="javascript:createDIV()">DIV 생성</a>
</body>
<script>
function createDIV(){
const new_div = document.createElement("div");
new_div.innerHTML = "새로 생성된 div입니다.";
new_div.style.backgroundColor = "yellow";
document.body.appendChild(new_div);
new_div.onclick = function(){
this.parentElement.removeChild(this);
}
}
</script>
</html>
실습(event(1))
- 클릭 이벤트
<!DOCTYPE html>
<html lang="en">
<head>
<meta charset="UTF-8">
<meta http-equiv="X-UA-Compatible" content="IE=edge">
<meta name="viewport" content="width=device-width, initial-scale=1.0">
<title>클릭 이벤트</title>
</head>
<body>
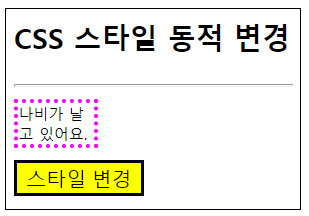
<h3>CSS 스타일 동적 변경</h3>
<hr>
<p>
나비가 날고 있어요.
</p>
<input type="button" value="스타일 변경">
</body>
<script>
const input = document.querySelector("input[type='button']");
const p = document.getElementsByTagName("p")[0];
input.addEventListener("click", function(){
this.style.background = "yellow";
p.style.fontSize = "8px";
p.style.border = "3px dotted magenta";
p.style.width = "10vw";
});
</script>
</html>

실습(event(2))
- 포커스 이벤트
<!DOCTYPE html>
<html lang="en">
<head>
<meta charset="UTF-8">
<meta http-equiv="X-UA-Compatible" content="IE=edge">
<meta name="viewport" content="width=device-width, initial-scale=1.0">
<title>포커스 이벤트</title>
</head>
<body>
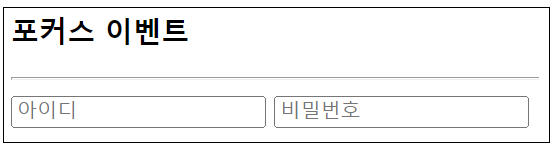
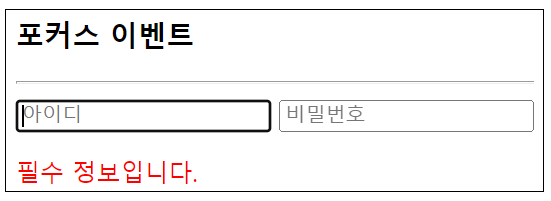
<h3>포커스 이벤트</h3>
<hr>
<form name="joinForm">
<input type="text" name="id" placeholder="아이디" autocomplete="off">
<input type="password" name="pw" placeholder="비밀번호">
<p id="result"></p>
</form>
</body>
<script>
// form태그는 자동으로 객체가 생성되고 객체명은 name속성에 작성한 이름이다.
// form태그의 프로퍼티는 자식요소 중 input태그의 name이다.
// 프로퍼티 접근 시 해당 객체를 가져온다.
const input = joinForm.id;
const p = document.querySelector("form p#result");
input.onblur = function() {
if(!this.value) {
p.innerHTML = "필수 정보입니다.";
p.style.color = "red";
this.focus();
} else{
p.innerHTML = "";
}
};
</script>
</html>
'웹 개발 > JavaScript' 카테고리의 다른 글
| [Web_JavaScript] 14 (0) | 2022.05.10 |
|---|---|
| [Web_JavaScript] 13 (0) | 2022.05.09 |
| [Web_JavaScript] 11 (0) | 2022.05.07 |
| [Web_JavaScript] 10 (0) | 2022.05.06 |
| [Web_JavaScript] 09 (0) | 2022.05.05 |


