● API(Application Programming Interface)
- 개발에 필요한 라이브러리들의 집합
- 다른 개발자들이 만들어 놓은 소스코드
1. 내부 API
- JDK 설치 시 제공해주는 기본 API
- API 사이트 : docs.oracle.com/javase
2. 외부 API
- 다른 개발자들이 개발한 패키지 및 클래스들을 의미한다.
- 보통 JAR 파일로 배포하며 자바 프로젝트의 build path에 추가하여 사용할 수 있다.
● API 주석(어노테이션(@) 주석)
/**
@
*/
● JAR 파일로 배포하기
1. 배포할 클래스 또는 패키지 우클릭 후 Export 클릭
2. JAVA/JAR file 선택 후 Next 클릭
3. destination을 원하는 경로로 선택
4. Export Java source files... 체크 후 Finish 클릭
● JAR 파일을 프로젝트에 추가하기
1. 배포된 JAR파일을 다운 받기
2. 프로젝트 우클릭 > Build Path > Configure Build Path 클릭
3. Libraries 탭 클릭 > ClassPath(안되면 ModulePath) 클릭 > Add External JARs 클릭
4. 저장된 경로의 .jar파일을 더블 클릭으로 추가 > Apply 클릭
5. Orders and Exports 탭 클릭 > Select All 클릭 > Apply and Close 클릭
실습(API(1))
1. MyMath.java 생성
/**
 *
 * @author Citron
 *<br>
 *Calculator
 *<br>
 *@since JDK11
 */
public class MyMath {

	/**
	 * Add num1 and num2
	 *
	 * @param num1 : First Number to add
	 * @param num2 : Last Number to add
	 * <br>
	 * example)
	 * <br>
	 * add(10, 3)
	 * <br>
	 * It is returning 13
	 * @throws ArithmeticException
	 * @see {@link Math}
	 */
	public void add(int num1, int num2) {
		System.out.println(num1 + num2);
	}

}
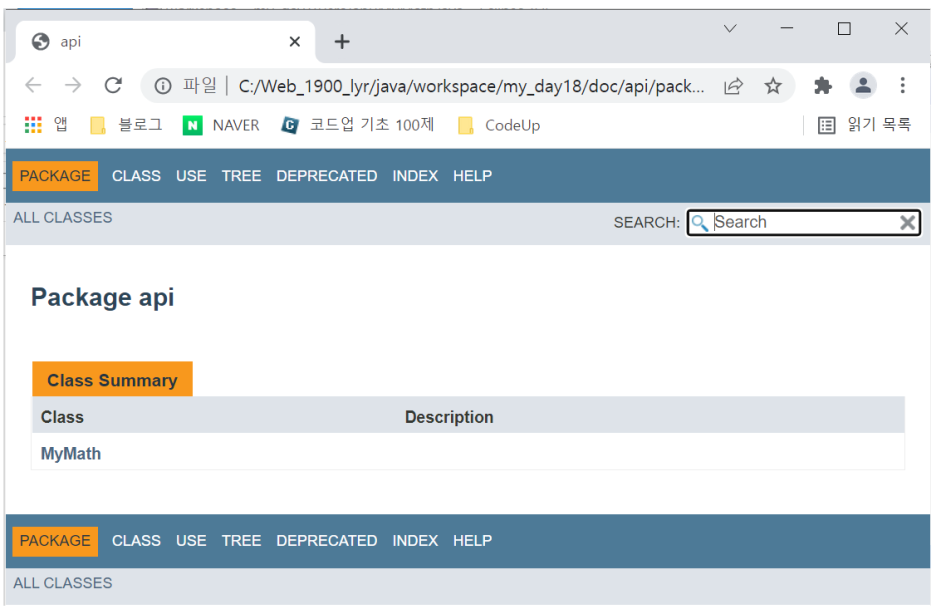
2. 해당 파일 우클릭 → Export → Javadoc → Finish
3. 파일탐색기에서 자바 파일이 존재하는 workspace → javaproject 선택 → doc → index.html 실행
실습(API(2))
1. MyMath.java 생성
/**
 *
 * @author Citron
 *<br>
 *Calculator
 *<br>
 *@since JDK11
 */
public class MyMath {

	/**
	 * Add num1 and num2
	 *
	 * @param num1 : First Number to add
	 * @param num2 : Last Number to add
	 * <br>
	 * example)
	 * <br>
	 * add(10, 3)
	 * <br>
	 * It is returning 13
	 * @throws ArithmeticException
	 * @see {@link Math}
	 */
	public void add(int num1, int num2) {
		System.out.println(num1 + num2);
	}

}
2. API_Test.java의 main 메소드에서 실행
public class API_Test {
	public static void main(String[] args) {

		MyMath myMath = new MyMath();
		myMath.add(10, 5);

	}
}

import java.util.HashMap;

import org.json.simple.JSONObject;

import net.nurigo.java_sdk.api.Message;
import net.nurigo.java_sdk.exceptions.CoolsmsException;

public class SMS {

	public static void main(String[] args) {
		String api_key = "NCS2DUUFOFUCRIYV";
	    String api_secret = "IAIY3TR9KECRRWE2GYTUKLANMRQCJ1YZ";
	    Message coolsms = new Message(api_key, api_secret);

	    // 4 params(to, from, type, text) are mandatory. must be filled
	    HashMap<String, String> params = new HashMap<String, String>();
	    params.put("to", "01064791807");
	    params.put("from", "01064791807");
	    params.put("type", "SMS");
	    params.put("text", "택배 문앞에 놓고 갑니다.");
	    params.put("app_version", "test app 1.2"); // application name and version

	    try {
	      JSONObject obj = (JSONObject) coolsms.send(params);
	      System.out.println(obj.toString());
	    } catch (CoolsmsException e) {
	      System.out.println(e.getMessage());
	      System.out.println(e.getCode());
	    }
	}

}
3. api_key, api_secret, params.put() 값 변경
- api_key, api_secret는 "Coolsms"에서 생성한 자신의 API 정보를 넣어준다.
4. 실행
- 실행 시 입력한 정보에 따라 sms가 발송된다.
'웹 개발 > Java' 카테고리의 다른 글
| [Web_JAVA] 29 (0) | 2022.03.15 |
|---|---|
| [Web_JAVA] 28 (0) | 2022.03.14 |
| [Web_JAVA] 26 (0) | 2022.03.12 |
| [Web_JAVA] 25 (0) | 2022.03.11 |
| [Web_JAVA] 24 (0) | 2022.03.10 |


